Building a charcuterie board is one of those things that looks complicated but is actually very approachable once you know the order. The secret isn’t having the most expensive ingredients or the fanciest board, it’s knowing where to place things and why. Follow these steps on where to place cheese, meat, bowls, fruit, crackers and your board will look intentional, beautiful, and full every single time.
This guide works for any size board, whether you’re putting together a small board for two or a large spread for a crowd. You might also like the 3 3 3 3 Method for building a charcuterie board.
Hi, I’m Gretchen - creator of Amazing Charcuterie Boards. I help home hosts and beginners create beautiful, stress-free charcuterie boards with simple rules, realistic portions, and easy styling techniques.

If you’re planning your next board, you may also find these helpful:
→ Charcuterie Board Portion Calculator
→ How to Design a Charcuterie Board (simple rules & layouts)
→ The Best Charcuterie Board Pairings

Want more board ideas and planning guides? Join my free newsletter here or search ideas.
The Golden Rule of Charcuterie Board Placement
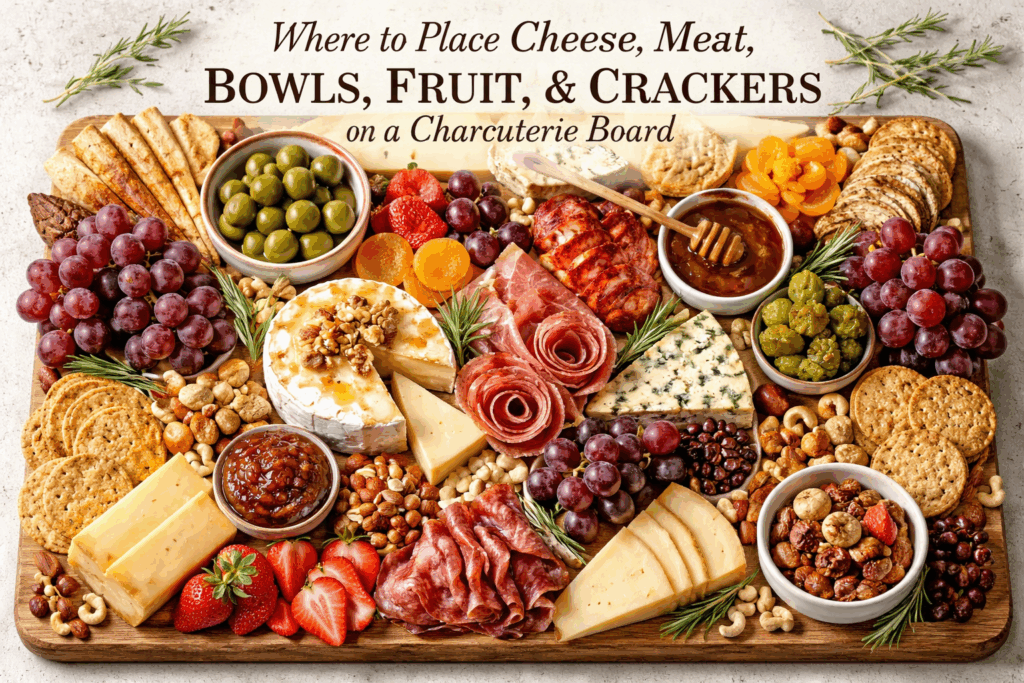
Always build from the largest items to the smallest. The big anchor pieces: your cheeses and bowls, go down first and set the layout for everything else. From there, you fill in around them. If you try to add your crackers and fruit first, you’ll quickly run out of room for the things that matter most.
Think of it like arranging furniture in a room. You place the sofa before the side tables, not the other way around.
Step 1: Place Your Bowls First
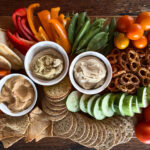
Before anything else goes on the board, put your small bowls, ramekins, or jars down first. These are your anchors. They take up fixed space and can’t be reshaped or folded to fit around other items — so they need to claim their spot early.
Spread your bowls out across the board rather than clustering them together. A good rule of thumb is to place one bowl in each quadrant of the board if you’re using multiple. This naturally divides your board into zones and gives your eye a place to travel.
What goes in bowls: jams, honey, mustard, olives, cornichons, dips, or any wet or loose ingredient that would roll around or make a mess if placed directly on the board.
Sizing tip: Use bowls that are proportional to your board. A tiny ramekin gets lost on a large board; an oversized bowl crowds a small one.
Step 2: Place Your Cheeses
With your bowls anchored, cheese goes down next. Cheese is the star of any charcuterie board, so it deserves prime real estate — but it also needs to be spread out so guests can reach it from multiple sides of the board.
Aim for odd numbers: three or five cheeses feel more natural and visually interesting than two or four lined up in a row. If you’re using a variety of shapes (a wedge, a block, a wheel), scatter them across the board so no single area feels too heavy.
Give each cheese its own space. Don’t push them up against each other — the gap between cheeses is where you’ll fill in your meats, fruit, and crackers in the next steps.
How to prep your cheese for placement:
- Leave soft cheeses (brie, camembert) whole or cut a small wedge to show the inside and invite guests to dig in
- Slice semi-firm cheeses (gouda, havarti, manchego) into thin pieces or fan them slightly so they’re easy to grab
- Break hard cheeses (parmesan, aged cheddar) into rough chunks rather than slicing — it looks more rustic and intentional
Add a cheese knife or spreader next to each cheese so guests know how to serve it and don’t cross-contaminate flavors.

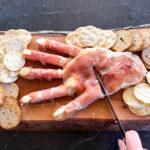
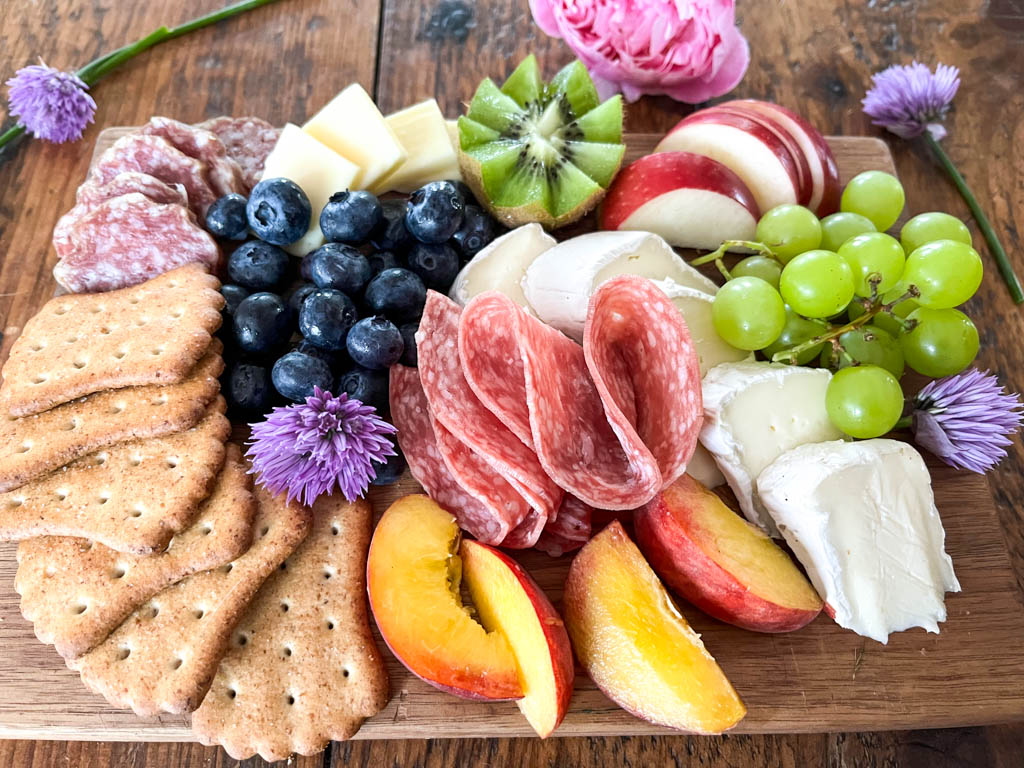
Step 3: Add Your Meats
With cheese placed, tuck your meats in around them — not in a separate zone, but woven throughout the board. The goal is to make the board feel abundant and layered, not like a sorted lunch tray.
How to style your meats:
- Salami roses: Stack 4–5 slices, fold them in half, then roll them up and stand them on the board. These add instant height and a beautiful visual detail.
- Folded slices: Fold round slices in half or quarters and fan them in a loose arc near a cheese.
- Ribbon folds: For thin, delicate meats like prosciutto, drape them in loose, flowing ribbons rather than folding tightly. They look elegant and are easy to pull apart.
Placement tip: Place your meats close to the cheeses they pair best with. Prosciutto pairs beautifully next to a creamy brie; a bold salami sits well alongside a sharp cheddar or aged gouda. This makes it easier for guests to build their own perfect bite.
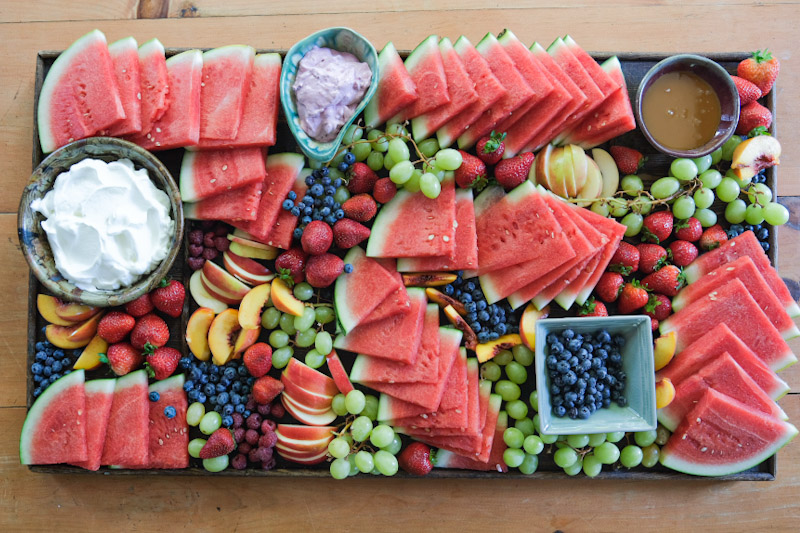
Step 4: Add Your Fresh and Dried Fruit
Fruit is one of the best tools you have for filling gaps and adding color to the board. By step four, your board has structure — now fruit brings it to life.
Fresh fruit: Grapes are the most useful item on a charcuterie board. Their clusters fill odd-shaped gaps naturally and add a pop of color. Tuck them into the spaces between cheese and meat groupings. Sliced strawberries, figs, or apple slices can be fanned out in small clusters wherever you have a flat open space.
Dried fruit: Dried apricots, cranberries, or dates are smaller and denser, so use them to fill tighter spots where fresh fruit won’t fit. They also add a rich sweetness that balances salty meats and sharp cheeses beautifully.
Color matters here. Look at your board as you add fruit and pay attention to where the color is clustering. If one side of the board is very dark (olives, salami, aged cheese), bring in a bright fruit on that side to balance it out.

Step 5: Place Your Crackers and Bread
Crackers go in last — not because they’re an afterthought, but because they’re flexible. Unlike cheese and bowls, crackers can be tucked, fanned, and angled to fill whatever space remains, which makes them the perfect finishing tool.
Fan your crackers in small stacks of 5–7, fanning them slightly so guests can see what they are and easily grab one. Place these fans at the edges of the board or alongside a cheese so the pairing is obvious.
Variety adds interest. If you’re using two types of crackers (say, a plain water cracker and a seeded crispbread), alternate them around the board rather than placing all of one kind together. This keeps the board looking varied and gives guests more to explore.
Bread and crostini: If you’re including sliced baguette or crostini, stack them loosely in a small cluster or in a separate basket nearby. Bread takes up a lot of room on the board itself, so a small basket alongside the board is often a better option — especially on smaller boards.
One important note: Don’t add crackers too far in advance. They can absorb moisture from fruit and cheese and go soft. Add them 15–20 minutes before guests arrive for the best texture.
Step 6: Fill Every Gap with Nuts and Small Accents
Stand back and take a look at your board. There will be small gaps — and that’s completely normal. This final step is about filling those spots so the board looks lush and full rather than sparse.
Nuts are perfect for this. Almonds, cashews, walnuts, and pecans tuck into any space and add both visual texture and a satisfying crunch. Scatter them loosely into the gaps rather than piling them in one spot.
Other small accents to fill gaps:
- Fresh herbs like rosemary or thyme (tuck sprigs into corners for a beautiful finishing touch and a subtle fragrance)
- Chocolate pieces or yogurt-covered pretzels for a sweet note
- Extra olives or cornichons if you have room outside the bowls
- Edible flowers for a special occasion board
The goal is for there to be no visible board surface left showing — every inch should feel purposeful and inviting.
Full Placement Order at a Glance
- Bowls — anchors first, spread across the board
- Cheese — the stars, placed in odd numbers with space between them
- Meats — woven in around the cheese, styled with folds and roses
- Fruit — fills gaps, adds color, balances flavor
- Crackers — fanned at the edges, added last before serving
- Nuts and accents — fill every remaining gap
Follow this order every time and your board will always look full, balanced, and beautiful — no matter the size or budget.
A Few Extra Tips
Work from the outside in on a large board. Place your anchors near the edges first, then fill toward the center. This prevents everything from clustering in the middle and leaving the edges bare.
Don’t overthink it. Charcuterie boards are meant to look abundant and a little rustic — not perfectly symmetrical. If something doesn’t look right, move it. It’s one of the most forgiving things you can make.
Use odd numbers throughout. Three cheese wedges, five salami roses, two clusters of grapes. Odd numbers look more natural and visually balanced than even groupings.
Looking for more guidance on what to buy? Check out the charcuterie board portion calculator to figure out exactly how much of each ingredient you need, or browse the best charcuterie board pairings to build combinations your guests will love.